How to open ports in Linux on WEkEO
A firewall is software or firmware that enforces a set of rules defining which data packets are allowed to enter or leave a network. It is responsible for managing Allow and Deny rules for ports and protocols.
In this article, we explain how to open ports on two Linux distributions:
Ubuntu using UFW
CentOS 9 using firewalld
Regardless of the firewall package used, the end result is the same: controlled and secure network access.
What we are going to cover
Prerequisites
No. 1 Account
You need a WEkEO hosting account with access to the Horizon interface: https://horizon.cloudferro.com.
No. 2 Create virtual machines
To test the firewall configuration, create one Ubuntu VM and one CentOS 9 VM in your WEkEO cloud project. Assign a public IPv4 address to each virtual machine so that you can connect to them using SSH.
The following articles may serve as a reference:
How to create a Linux VM and access it from Windows desktop on WEkEO
How to create a Linux VM and access it from Linux command line on WEkEO
No. 3 Security group allowing SSH
For both virtual machines, make sure that port 22/tcp is allowed in the associated security group so that SSH connections work.
No. 4 Sudo privileges
You must be able to execute commands with sudo on both systems.
Ubuntu
Ubuntu includes the UFW (Uncomplicated Firewall) service by default. It provides a simplified and user-friendly interface for managing firewall rules.
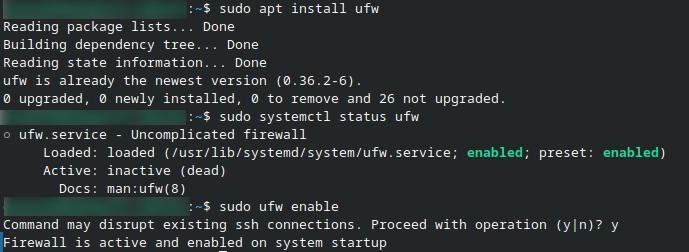
In most cases, UFW is already installed on Ubuntu systems. If the package is missing, install it using the following command:
sudo apt install ufw
Checking the service status
Check the current status of the UFW service:
sudo systemctl status ufw
Enabling the firewall
Enable UFW so that firewall rules are actively enforced:
sudo ufw enable
Start working with UFW on Ubuntu
Opening ports
UFW allows you to open ports either by specifying explicit port numbers or by using symbolic service names. Symbolic names are predefined aliases that map common services to their standard ports and protocols, making rules easier to read and maintain.
Opening a specific TCP port
To allow incoming traffic on a specific TCP port, use the following syntax:
sudo ufw allow <port>/tcp
Example (allow DNS over TCP on port 53):
sudo ufw allow 53/tcp
Using symbolic service names
UFW includes a list of well-known service names that correspond to common port and protocol combinations. When you use a service name, UFW automatically applies the correct port and protocol.
Example:
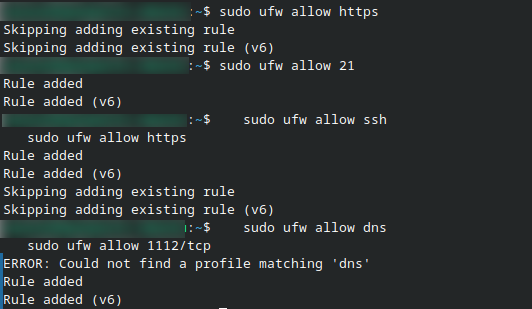
sudo ufw allow https
This command allows HTTPS traffic (TCP port 443).
Common symbolic service names
The following table lists some commonly used symbolic service names supported by UFW:
ssh |
22 / tcp |
Secure remote access |
http |
80 / tcp |
Web traffic (unencrypted) |
https |
443 / tcp |
Secure web traffic |
ftp |
21 / tcp |
File transfer |
dns |
53 / tcp, udp |
Domain name resolution |
Allowing both TCP and UDP traffic
If a service requires both TCP and UDP, you can allow the port without specifying the protocol.
Example (FTP control traffic on port 21):
sudo ufw allow 21
Typical configuration examples
Below are a few common firewall rule combinations used in typical server setups.
Allow SSH and HTTPS only:
sudo ufw allow ssh
sudo ufw allow https
Allow a web server with HTTP and HTTPS:
sudo ufw allow http
sudo ufw allow https
Allow DNS and restrict access to a specific application port:
sudo ufw allow dns
sudo ufw allow 1112/tcp
Allowing traffic from a specific IP address
To allow incoming traffic only from a specific IPv4 address:
sudo ufw allow from 190.34.21.113
Verifying the configuration
Display the active firewall rules:
sudo ufw status verbose
The output is presented as a table with three main columns.

Explanation:
- To
Destination port and protocol
- Action
Indicates whether traffic is allowed or denied
- From
Source address (for example, Anywhere or a specific IP address)
CentOS 9
CentOS 9 uses firewalld, a more advanced firewall management tool based on zones. Zones define trust levels for network interfaces.
firewalld acts as a frontend controller for iptables and allows persistent rule management.
Installing firewalld
Install the firewalld package:
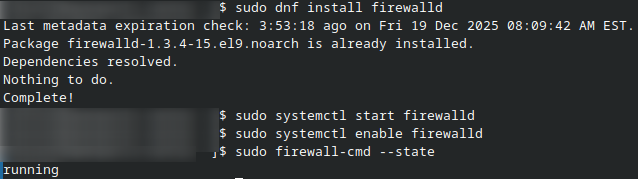
sudo dnf install firewalld
Starting and enabling the service
Start the firewalld service:
sudo systemctl start firewalld
Enable it to start automatically on boot:
sudo systemctl enable firewalld
Checking the service state
Verify that firewalld is running:
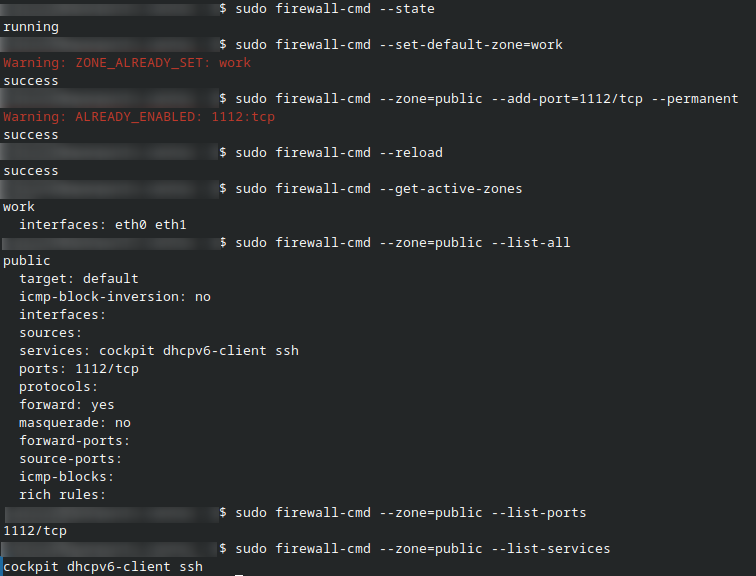
sudo firewall-cmd --state
Start working with firewalld
Understanding firewalld commands
When working with firewalld, you will notice two different command types being used: systemctl commands and firewall-cmd commands. This is expected and not an inconsistency.
firewalld is the firewall service (daemon) running on the system
firewall-cmd is the command-line client used to configure that service
Service management vs firewall configuration
Commands using systemctl manage the firewalld service itself. They control whether the firewall daemon is running and whether it starts automatically at boot time.
Examples:
sudo systemctl start firewalld
sudo systemctl enable firewalld
Firewall rule configuration
Commands using firewall-cmd interact with the running firewalld daemon. They are used to configure firewall rules, zones, ports, and services.
Example:
sudo firewall-cmd --state
Working with zones
The default zone is public. To change it to another zone called work, run:
sudo firewall-cmd --set-default-zone=work
Opening a TCP port
Allow TCP traffic on port 1112 permanently in the public zone:
sudo firewall-cmd --zone=public --add-port=1112/tcp --permanent
Applying changes
Reload firewalld to apply the configuration:
sudo firewall-cmd --reload
Reviewing active rules
You can list active ports and services assigned to a zone using the firewall-cmd command.
To display the currently active zone and its rules:
sudo firewall-cmd --get-active-zones
To list all services and ports allowed in the public zone:
sudo firewall-cmd --zone=public --list-all
If you want to list only ports allowed in the zone:
sudo firewall-cmd --zone=public --list-ports
To list only services allowed in the zone:
sudo firewall-cmd --zone=public --list-services
These commands help you quickly verify which ports and services are currently permitted by firewalld.
Allowing SSH from a specific IP address
To allow SSH access only from a specific IPv4 address, use a rich rule:
sudo firewall-cmd \
  --zone=public \
  --add-rich-rule 'rule family="ipv4" source address="192.168.13.44" port port="22" protocol="tcp" accept' \
  --permanent
Reload firewalld to activate the rule:
sudo firewall-cmd --reload
Summary
UFW is the default firewall on Ubuntu and provides a simple configuration model.
firewalld is the default firewall on CentOS 9 and uses zone-based management.
Always verify firewall rules after applying changes to avoid accidental lockouts, especially when working over SSH.
What To Do Next
You can also open ports from the Horizon interface, using security groups. See this article for basic information: How to use Security Groups in Horizon on WEkEO.
See this article to access the inner workings of a virtual machine through a console in Horizon: How to access the VM from OpenStack console on WEkEO.